In today's date, pictures play an important part to make your document interesting to read and easy to understand
Now in this post, you will learn how to add a picture to your document and its formatting
In your document, you can add pictures at any place
so let's learn how we can insert pictures into a document
You can add pictures to your document in many ways
 |
1 Pictures - You can add images/ pictures to your document through PICTURES tool.
With the help of this tool, you can add those pictures which are saved on your computer or laptop
How to use this option- firstly to open picture option go to insert tab>>click on pictures option
- then picture option open and show all the files which are saved on your device
- and then you select the image and click on insert
- the image is inserted where you cursor show
- here you can increase and decrease the size of the image as per your choice
2 Online pictures - In the online pictures options you can add those images which you can search for various online sites
How to use this option
- Firstly to open online pictures option go to insert tab>> click on online pictures option
- the online picture box open
- in this box, you can search anything just like you search on google
- after you search the image you can insert it by just clicking on insert
- Here you can choose and insert one or more images for your document
- After inserting a picture you make changes in display of your picture through format tab
- After you insert a picture, automatically format tab is open just like this
NOTE -If format tab is not open then double-click the picture to open the format tab
In the Format tab, there are various option so let us discuss them one by one
Adjust - It will adjust the picture display i.e it will make the image darker or lighter etc
- Remove background - It will remove the background of your picture. By click on the remove background, 5 options are occur
- Mark areas to keep - In this, you will draw the line to mark areas to put that area in the picture, not to remove it
- Mark areas to remove - In this, you will draw the line to mark areas to remove that area from the picture.
- Delete mark - It will remove all the lines you have drawn in mark areas
- Discard all changes -It will close the background removal and discard all changes
- keep changes - It will save all changes you make in remove background option
3. color- This will change the color of the picture for example
as you see in this picture colorful picture changes into green color
and there are also more effects on the COLOR option
4.Artistic effects-
In the artistic effects, you can change the picture display by showing watercolor painting, pencil picture etc.
5.Compress picture - This tool helps to decrease the size of the picture so that size of the document reduces. If in case you want to send your document through email but the size of the file is more and you can't insert the document containing pictures then you can use this tool and reduce the size of the picture of the document
how you reduce the size of the document
- firstly insert picture
- then click on formatting
- then click on compress picture tool
- then there is an option of email -minimize document size so click on it
press ok and this reduces the size of a picture so document size reduces
Note. Here you cannot see any change in size of the document only you can see that you can now insert the document successfully
5. Change picture - if you want to change the present picture of the document you can this tool.With the help of this tool, you can change the present picture into a new one by just clicking on change picture tool.
It has 2 option in this
the first one you can insert a new picture that is saved on your pc
or you can insert a new picture by using web search option
6. Reset picture - Now in this tool, you can now change all formatting into an original one be its size or a display of picture
7.Picture Style- This tool help to change the border of a picture and its shape also
As you see in this there are various effects and different shapes to change the picture. you can use anyone by just clicking on it.
8. Picture border - In this tool, you can see various option
In this tool, you can choose any border color for your picture and in fact, you don't want any border/outline you just simply click on NO OUTLINE option
secondly in this you can choose weight of your border by just clicking on WEIGHT option
Thirdly you can choose different type of border design by just clicking on DASHES option
Arrange - IN this tool you can arrange the text with the picture
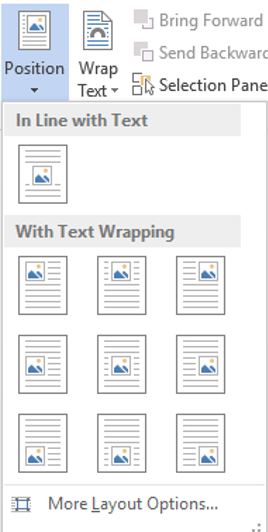
1.Position - In this tool, you just simply give position to a picture the text wrap around it automatically
In this you can choose any position of the picture, for example, it may be a center, top left and right, middle left and right etc.
2.Wrap Text -
In this tool, you can choose how your text wrap around a picture . for example your text may all around your picture, behind the picture etc.
so there are many options in this you can use anyone in your document
3.Bring Forward - In this tool, you can arrange many pictures
It has three options
- Bring forward - so what does this option do 🤔. This option help to arrange your photos. it will bring your photo one level forward.
example - you have three photos on the screen you want to show your third photo to second place so in that case, you use this option
- bring to front - in this, you can bring about your third photo to the first place
- Bring in front of text - As a name suggest this option help in to bring your photo in front of text
4 .send backward - This tool help to sent back pictures. This is just opposite to bring backward
It also has three options.
- send backward - this will send your image to the one level down. This means you can place your front photo or no.one position to the second level position.
- Send to back - This will send your photo from the first position to the last position
- Send behind text - This will bring your photo behind the text. that means in above the photo your text has written.
5. Selection pane - when you click on this tool a selection box is open just right of the screen containing no. of a picture displayed on the screen. Just like that
By just clicking on the specific picture, that picture will be selected.
6.Align -
in this align tool there are many options to align the picture as per your need. By just select the picture any option of your need
7.Group -
- - this will group the object as a single unit. if you do any formatting and editing that can be done in the whole unit
- ungroup - this will ungroup the object from a single unit to a separate unit
8.Rotate -
Crop -
This tool help to crop the picture. if you want a specific portion of a picture this tool help you
- Crop-In this option you will crop the picture of your choice or want. when you click on this option CROP a black dash all over the picture show by clicking on this dash you can crop the area you don't want
- Crop to shape - In this option, you will crop the image in the shape you want just like that
By just clicking on any shape a crop change into that one
- Aspect ratio - when you click on this option some respective ratio box open and you have to choose the ratio you want from this box
Fill- Fill match the picture size to match the height or width of shape whichever is greater
Fit -It sets the picture size so that picture height and width both match the shape boundaries


 As you can see this text wrap around a picture throughly this can be done by through option


Comments
Post a Comment